

Introduction
The following can be defined for branches:
the number of output pins
the position of the input pin
The following can be defined for joints:
the number of input pins
the position of the output pins
Defining the number of pins using the mouse
Defining the number of pins using the mouse:
Step |
Action |
|---|---|
1 |
Select the branch or joint. Result: A change label is placed at both ends of the branch or joint. Example:  |
2 |
Place the mouse pointer on one of the change labels. Result: The mouse pointer changes
its symbol to |
3 |
Drag the branch or joint in the desired direction using the mouse. Result: The branch or joint is expanded to the desired number of pins. Example:  |
 .
.Defining the number of pins using the properties dialog box
Defining the number of pins using the properties dialog box:
Step |
Action |
|---|---|
1 |
Open the properties dialog box for the branch or joint. Result: The properties dialog box for the branch or joint is opened. Example of a properties dialog box for branches: 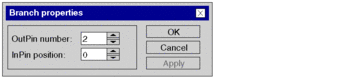 |
2 |
Enter the desired number of output pins (for branches) or the desired number of input pins (for joints). Example of a properties dialog box for branches:  |
3 |
Confirm the entry with . Result: The number of pins is accepted. Example:  |
Defining the position of the input or output pin
Defining the position of the input pin (for branches) or output pin (for joints):
Step |
Action |
|---|---|
1 |
Open the properties dialog box for the branch or joint. Result: The properties dialog box for the branch or joint is opened. Example of a properties dialog box for branches: 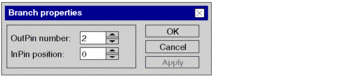 |
2 |
Enter the target position of the input pin (for branches) or the position of the output pin (for joints). Note: The position numbers start at 0. Example of a properties dialog box for branches: 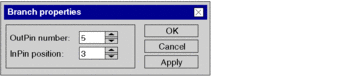 |
3 |
Confirm the entry with . Result: The position of the input or output pin is accepted. Example:  |