Procedure for accessing PLC parameters
You must perform the following actions to access the communication parameters of the PLC:
Step |
Action |
|---|---|
1 |
|
2 |
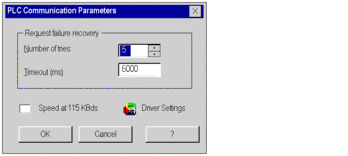
Click on the Communication Parameters button in the PLC field to display the following screen:  |
3 |
Modify the parameters you wish to change:
Note: Click on Driver Settings to display the driver management screen. |
4 |
Confirm with OK. Note: Any modification to the communication parameters of the PLC will only actually be taken into account if it is confirmed by clicking OK in the Set Address screen. Clicking Cancel cancels acknowledgment of any modifications. |
Procedure for accessing simulator parameters
You must perform the following actions to access the communication parameters of the simulator:
Step |
Action |
|---|---|
1 |
|
2 |
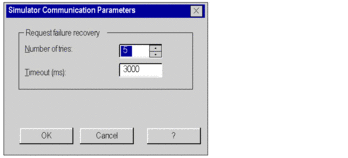
Click on the Communication Parameters button in the Simulator field to display the following screen:  |
3 |
Modify the parameters you wish to change:
|
4 |
Confirm with OK. Note: Any modification to the simulator communication parameters will only actually be taken into account if it is confirmed by clicking OK in the Set Address screen. Clicking Cancel cancels acknowledgment of any modifications. |
Procedure for accessing bandwidths
You may divide up the bandwidth quota allocated to Control Expert for the selected communication medium between the different functions available in online mode.
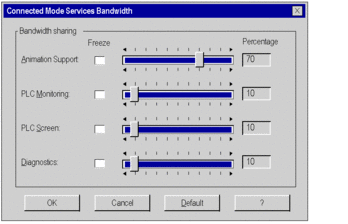
This screen is used to define the percentage of bandwidth allocated to each of the 4 categories of functionality in online mode:
Animation Support: animation tables, operator screens, animation of language editors, application-specific screens. The higher the percentage allocated, the higher the frequency with which the data in the PLC will be scanned.
PLC Monitoring: monitoring of the overall operating mode of the PLC (Run or Stop), or of its tasks for the "Program debugging" function. The higher the percentage allocated, the higher the frequency with which the state of the PLC and its tasks will be scanned.
PLC Screen (PLC debug screen): the higher the percentage allocated, the higher the frequency with which the PLC and application information will be scanned.
Diagnostics (Diagnostic Viewer). The higher the percentage allocated, the higher the frequency with which the alarms in the PLC will be acquired.
This screen is used to optimize performance in online mode, by adjusting the parameters to suit:
the characteristics of the project loaded onto the PLC: numerous and frequent diagnostics alarms, many animation screens open at once
and the use made of online mode: the most frequently used functions.
Procedure:
Step |
Action |
|---|---|
1 |
|
2 |
Click on the Bandwidth button to display the following screen:  |
3 |
Using the sliders, adjust the parameter values to suit the characteristics of your project and the functions you use most frequently in online mode. |
4 |
Click on the Default button if you want to revert to the default values. |
5 |
The Freeze option is used for fine adjustment (in increments) of the parameters to suit the characteristics of the project loaded in the PLC. It is used to retain the value of a parameter once the response time of the corresponding function has been determined, and then adjust only the parameters corresponding to the other functions. |
6 |
Confirm with OK. Note: Any modification will only actually be taken into account if it is confirmed by clicking OK in the Set Address screen. Clicking Cancel cancels acknowledgment of any modifications. |


