The Remote I/O Drop dual Channel modules are used to transfer data bi-directionally over a coaxial cable network between I/O modules installed in the same (RIO drop) backplane and the RIO head installed in the CPU backplane.
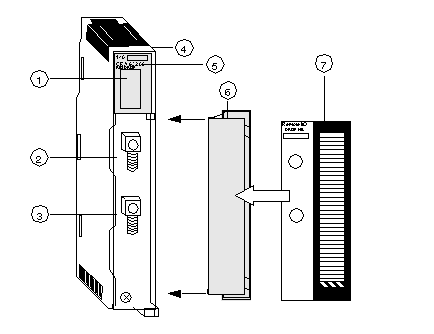
The following figure shows the Remote I/O (RIO) module’s parts.
1
LED Area
2
RIO Coax Connector (Channel A)
3
RIO Coax Connector (Channel B)
4
Version Label
5
Model Number, Module Description, Color Code
6
Removable Door
7
Customer Identification Label (Fold label and place it inside door)
NOTE: To maintain CE compliance with the European Directive on EMC (89/336/EEC), the RIO Head module must be connected using quad shielded cable (see the Remote I/O Cable System Planning and Installation Guide).
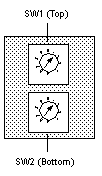
Two rotary switches are located on the rear panel of the RIO Drop Modules and are used for setting RIO drop addresses (refer to the illustration and table below).
SW1 (top switch) sets the upper digit (tens); SW2 (bottom switch) sets the lower digit (ones). The illustration below shows the correct setting for an example address of 11.
Rear Panel Switches Figure
The following figure shows the SW1 top and SW2 bottom switches.
SW1 and SW2 Switches Table
The following table shows the node addresses of the SW1 and SW2 switches.
|
Node Address
|
SW1
|
SW2
|
|
1 ... 9
|
0
|
1 ... 9
|
|
10 ... 19
|
1
|
0 ... 9
|
|
20 ... 29
|
2
|
0 ... 9
|
|
30 ... 32
|
3
|
0 ... 2
|
NOTE: Only addresses from 2 to 32 are valid
If "0" or an address greater than 32 is selected, the RIO module displays a flashing "Error A"- and "Error B"- LED.
With address “1” you don’t have flashing “Error A”- and “Error B”- LED.