|


|
Original instructions
|
|
|
Original instructions
|
|
Step
|
Action
|
|---|---|
|
1
|
Activate the Rebuild All Project command in the Build menu.
Result: the project is analyzed and generated by the software.
|
|
2
|
Any errors detected are displayed in the information window at the bottom of your screen.
|
|
Step
|
Action
|
|---|---|
|
1
|
Activate the Save As command in the File menu.
|
|
2
|
If necessary, select the directory to which the project will be saved (disk and path).
|
|
3
|
Enter the file name: PTO_JackExample.
|
|
4
|
Confirm with Save.
Result: the project is saved as PTO_JackExample.STU.
|
|
Step
|
Action
|
|---|---|
|
1
|
Use the PLC → Define the address command. Enter SYS if you are using a USB media that is directly connected from the PC (terminal) to the PLC.
|
|
2
|
Switch to online mode using the PLC → Connection command.
|
|
3
|
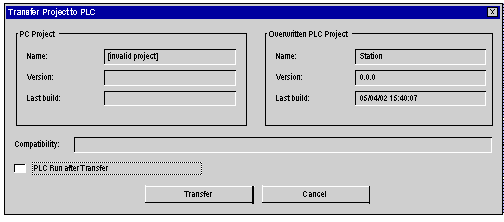
Activate the PLC → Transfer Project to PLC command.
Result: the screen used to transfer the project between the terminal and the PLC is displayed:
 |
|
4
|
Activate the Transfer command.
|
|
5
|
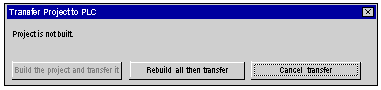
If the project has not been generated in advance, the screen below will be displayed allowing you to generate it before the transfer (Rebuild All then Transfer) or interrupt the transfer (Cancel Transfer).
 |
|
6
|
Transfer progress is displayed on screen. At any moment, you can interrupt the transfer by using the Esc key. In this case, the PLC project will be invalid.
Note: In the event that the project is transferred to a Flash Eprom memory card, the transfer can take several minutes.
|
