|
|
Original instructions
|

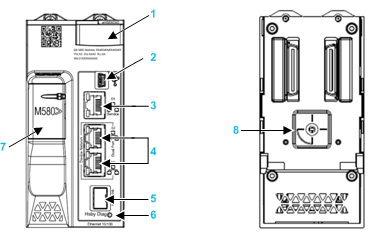
1LED diagnostic display panel
2Mini-B USB port for module configuration via PC running Control Expert
3RJ45 Ethernet service port connector
4RJ45 connectors that together serve as a dual port to the Ethernet network
5SFP socket for copper or fiber-optic Hot Standby link connection
6Hot Standby status link LED
7SD memory card slot
8A/B/Clear rotary selector switch, used to designate the PAC as either PAC A or PAC B, or to clear the existing Control Expert application

|
NOTICE
|
|
RISK OF UNINTENDED OPERATION
Use only the small, plastic screwdriver that ships with the module to change the rotary switch position. Using a metal screwdriver can damage the switch, rendering it inoperable.
Failure to follow these instructions can result in equipment damage.
|
|
Position
|
Result
|
|---|---|
|
A
|
|
|
B
|
|
|
Clear
|
NOTE: Setting the switch for each Hot Standby PAC to the same A/B position can cause a a conflict of PAC roles. |
|
Step
|
Action
|
|---|---|
|
1
|
Set the rotary switch to [Clear].
|
|
2
|
Power up the PAC.
|
|
3
|
Power down the PAC.
|
|
4
|
Set the rotary switch to [A] or [B].
|

|
Step
|
Action
|
|---|---|
|
1
|
Check that the CPU is powered off.
|
|
2
|
Position the transceiver so that its label is oriented to the left.
|
|
3
|
Press the SFP transceiver firmly into the socket until you feel it snap into place.
NOTE: If the SFP transceiver resists, check the orientation of the transceiver and repeat these steps. |
|
Step
|
Action
|
|---|---|
|
1
|
Check that the CPU is powered off.
|
|
2
|
Pull out the latch to unlock the transceiver.
|
|
3
|
Pull on the transceiver to remove it.
|
|
NOTICE
|
|
POTENTIAL EQUIPMENT DAMAGE
Do not Hot Swap the SFP transceiver. Insert or remove the transceiver only when there is no power to the CPU.
Failure to follow these instructions can result in equipment damage.
|

  DANGER DANGER |
|
HAZARD OF ELECTRIC SHOCK
If you cannot prove that the end of a shielded cable is connected to the local ground, the cable must be considered as dangerous and personal protective equipment (PPE) must be worn.
Failure to follow these instructions will result in death or serious injury.
|