|
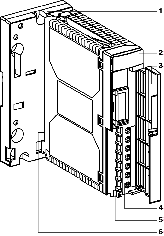
Physical description of the TSX SUP 1011 supply module
|
|


|
(Original Document)
|
|
Physical description of the TSX SUP 1011 supply module
|
|
|
(Original Document)
|
|
Numbers
|
Description
|
|---|---|
|
1
|
Support board for fixing the supply module directly onto the AM1-DE200 / DP200 DIN mounting track or the AM1-PA Telequick perforated board.
|
|
2
|
Display block with:
|
|
3
|
Flap for protecting the terminal block.
|
|
4
|
Screw terminal block for connection:
|
|
5
|
Hole for the cable-tightening clip to go through.
|
|
6
|
"NOR/LSH" switch placed at the back of the module to control the power optimization system.
Note: Access to the switch requires the module to be removed from the support board.
|
