

Overview
The following unconnected explicit messaging example
shows you how to use the DATA_EXCH function block
to retrieve diagnostic data from a remote device (at IP address 192.168.1.6).
This example is executing a Get_Attribute_Single of assembly instance 100, attribute 3.
You can perform the same explicit messaging service using the EtherNet/IP Explicit Message window.
Implementing the DATA_EXCH Function Block
To implement the DATA_EXCH function block,
create and assign variables for the following blocks:
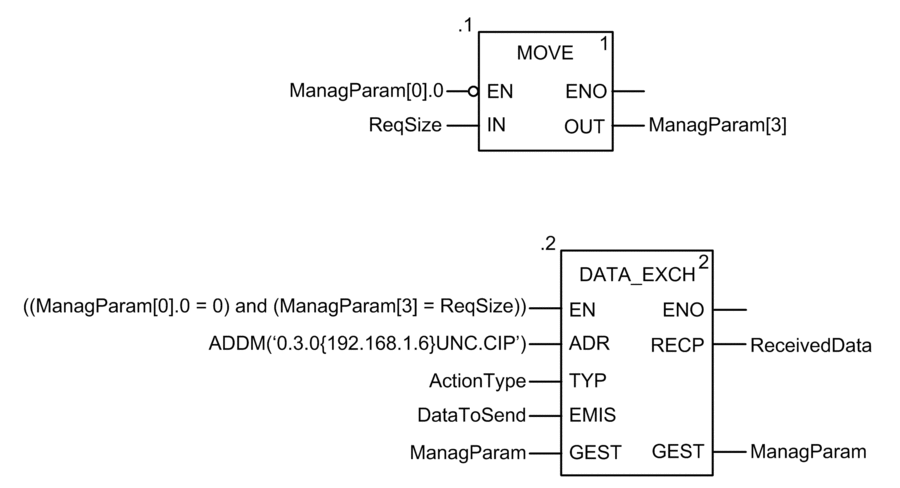
Configuring the Address Variable
The Address variable identifies the explicit message originating
device (in this example, the communication module) and the target
device. Note that the Address variable does not include the Xway address
elements {Network.Station} because we are not bridging through another
PLC station. As an example, use the ADDM function
to convert the following character string to an address:
ADDM(‘0.1.0{192.168.1.6}UNC.CIP’), where:
rack = 0
module (slot number) = 1
channel = 0
remote device IP address = 192.168.1.6
message type = unconnected
protocol = CIP
Configuring the ActionType Variable
The ActionType variable identifies the function type for the DATA_EXCH function block:
Variable |
Description |
Value (hex) |
|---|---|---|
ActionType |
Transmission followed by wait for response |
16#01 |
Configuring the DataToSend Variable
The DataToSend variable identifies the details of the CIP explicit message request:
Variable |
Description |
Value (hex) |
|---|---|---|
DataToSend[0] |
CIP request service information:
|
16#030E |
DataToSend[1] |
CIP request class information:
|
16#0420 |
DataToSend[2] |
CIP request instance information:
|
16#6424 |
DataToSend[3] |
CIP request attribute information:
|
16#0330 |
Viewing the Response
Use a Control Expert Animation table to display the ReceivedData variable array. Note that the ReceivedData variable array consists of the entire data buffer.
To display the CIP response, follow these steps:
Step |
Action |
|
|---|---|---|
1 |
In Control Expert, select Tools → Project Browser to open the Project Browser. |
|
2 |
In the Project Browser, select the Animation Tables folder, then click the right mouse button. A pop-up menu appears. |
|
3 |
Select New Animation Table in the pop-up menu. A new animation table and its properties dialog both open. |
|
4 |
In the Properties dialog, edit the following values: |
|
Name |
Type in a table name. For this example: ReceivedData. |
|
Functional module |
Accept the default <None>. |
|
Comment |
(Optional) Type your comment here. |
|
Number of animated characters |
Type in 100, representing the size of the data buffer in words. |
|
5 |
Click OK to close the dialog. |
|
6 |
In the animation table’s Name column, type the name of the variable assigned to the RECP pin: ReceivedData and press Enter. The animation table displays the ReceivedData variable. |
|
7 |
Expand the ReceivedData variable to display its word array, where you can view the CIP response contained in the ReceivedData variable. NOTE: Each
array entry presents 2 bytes of data in little endian format, where
the least significant byte is stored in the smallest memory address.
For example, ‘8E’ in word[0] is the lower byte, and
‘00’ is the upper byte.
|
|