

At a Glance
XXMIT supports the following Modbus function codes:
01 ... 06 and 15 ... 16
08
Modbus Port Configuration
XXMIT function is configured through its Function Block. The Function Block initializes the Modbus port 1 every time it is active, with the defined parameters. The XXMIT parameters can be displayed in the controller’s LCD display.
Example of XXMIT Function Block configuration:

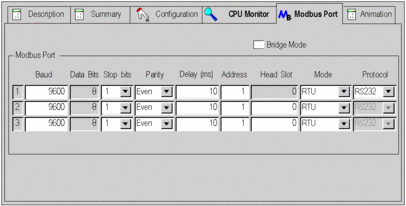
Example of CPU Configuration screen with different value set:
Example of settings on controller’s LCD display:

The 3 graphics above show different values for XXMIT function. Regardless of what is set or displayed in the CPU configuration screen or on the LCD display, the actual values used for transmission are the one from the XXMIT Function Block:
Baudrate: 19200
Parity: Even
Data Bits: 8
Stop Bits: 1
Transmit - Receive Transition
Except broadcast messages all Modbus functions require XXMIT to switch from transmit mode to receive mode in order to read the slave’s response. XXMIT switches from transmit to receive in the cycle following the transmit operation. It is the responsibility of the user to ensure that the slave’s response is delayed by at least one cycle time of the master to avoid communication failure.
The transmit delay on the slave side is especially important in cases of long master cycle times and fast slaves.
Timing considerations for the Slave Delay-time:
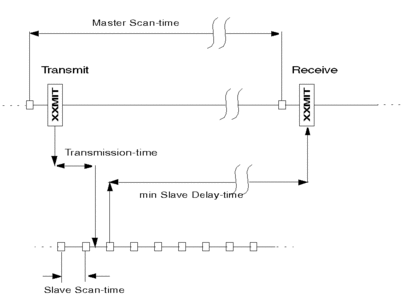
From the above figure (not to scale) you can estimate the influence of the three different times Master Scan-time, Transmission-time and Slave Scan-time on the required Slave Delay-time. As the master and slave scans are asynchronous, the Slave Scan-time should not be taken into account. The transmission-time depends on telegram type, baud rate and protocol. A standard Read request at 9600 baud using ASCII protocol for example takes 14 ms. The main contribution obviously comes from the Master Scan-time. So even the minimum Slave Delay-time could be less than the Master Scan-time, we recommend to use the Master Scan-time as the minimum Slave Delay-time to ensure a sound communication.
You must enter the required delay-time plus 10 ms. For example to have a 110 ms delay you must enter 120 in this field.
Modbus Function Codes (01 ... 06, 15 and 16)
For Modbus messages, the MsgOut array has to contain the Modbus definition table. This has to be defined as a field of words. The Modbus definition table for Modbus function code: 01, 02, 03, 04, 05, 06, 15 and 16 is five words long and you must set MsgLen to 5 for successful XXMIT operation. The Modbus definition table is shown in the table below.
Modbus Definition Table Function Codes (01 ... 06, 15 and 16)
Content |
Description |
|---|---|
Modbus function code (MsgOut[1]) |
XXMIT supports the following function codes: 01 = Read multiple bits (%Q) 02 = Read multiple discrete bits (%I) 03 = Read multiple words (%MW) 04= Read multiple input words (%IW) 05 = Write single bit (%Q) 06 = Write single words (%MW) 15 = Write multiple bits (%Q) 16 = Write multiple words (%MW) |
Quantity (MsgOut[2]) |
Enter the amount of data you want written to the slave PLC or read from the slave PLC. For example, enter 100 to read 100 words from the slave PLC or enter 32 to write 32 bits to a slave PLC. There is a size limitation on quantity that is dependent on the PLC model. Refer to Appendix A for complete details on limits. |
Slave PLC address (MsgOut[3]) |
Enter the slave Modbus PLC address. Typically the Modbus address range is 1 ... 247. To send a Modbus message to multiple PLCs, enter 0 for the slave PLC address. This is referred to as Broadcast Mode. Broadcast Mode only supports Modbus function codes that writes data from the master PLC to slave PLCs. Broadcast Mode does NOT support Modbus function codes that read data from slave PLCs. |
Slave PLC data area (MsgOut[4]) |
For a read command, the slave PLC data area is the source of the data. For a write command, the slave PLC data area is the destination for the data. For example, when you want to read bits (%I300 ... %I500) from a slave PLC, enter 300 in this field. When you want to write data from a master PLC and place it into words (%MW100) of a slave PLC, enter 100 in this field. Depending on the type of Modbus command (write or read), the source and destination data areas must be as defined in the Source and Destination Data Areas table below. |
Master PLC data area (MsgOut[5]) |
For a read command, the master PLC data area is the destination for the data returned by the slave. For a write command, the master PLC data area is the source of the data. For example, when you want to write bits (%M16 ... %M32) located in the master PLC to a slave PLC, enter 16 in the field. When you want to read words (%IW1 ... %IW100) from a slave PLC and place the data into the master PLC data area (%MW100 ... %MW199), enter 100 in this field. Depending on the type of Modbus command (write or read), the source and destination data areas must be as defined in the Source and Destination Data Areas table below. |
Source and Destination Data Areas for Function Codes (01 ... 06, 15 and 16)
Function Code |
Master PLC Data Area |
Slave PLC Data Area |
|---|---|---|
03 (Read multiple 4x) |
%MW (destination) |
%MW (source) |
04 (Read multiple 3x) |
%MW (destination) |
%IW (source) |
01 (Read multiple 0x) |
%M (destination) |
%Q (source) |
02 (Read multiple 1x) |
%M (destination) |
%I (source) |
16 (Write multiple 4x) |
%MW (source) |
%MW (destination) |
15 (Write multiple 0x) |
%M (source) |
%Q (destination) |
05 (Write single 0x) |
%M (source) |
%Q (destination) |
06 (Write single 4x) |
%MW (source) |
%MW (destination) |
When you want to send 20 Modbus messages out of the PLC, you must transfer 20 Modbus definition tables one after another into MsgOut after each successful operation of XXMIT, or you may program 20 separate XXMITs and then activate them one at a time through user logic.
Modbus Function Code (08)
For Modbus messages, the MsgOut array has to contain the Modbus definition table. This has to be defined as a field of words. The Modbus definition table for Modbus function code: 08 is five words long and you must set MsgLen to 5 for successful XXMIT operation. The Modbus definition table is shown in the table below.
Modbus Definition Table Function Codes (08)
Content |
Description |
|
|---|---|---|
Modbus function code (MsgOut[1]) |
XXMIT supports the following function code: 08 = Diagnostics |
|
Diagnostics (MsgOut[2]) |
Enter the diagnostics subfunction code decimal value in this field to perform the specific diagnostics function desired. The following diagnostic subfunctions are supported: |
|
Subfonction Code |
Description |
|
00 |
Return query data |
|
01 |
Restart comm option |
|
02 |
Return diagnostic word |
|
03 |
Change ASCII input delimiter |
|
04 |
Force listen only mode |
|
05 ... 09 |
Reserved |
|
10 |
Clear counters |
|
11 |
(& diagnostics words in 384, 484) |
|
12 |
Return bus messages count |
|
13 |
Return bus comm error count |
|
14 ... 15 |
Return bus exception error count |
|
16 |
Not supported |
|
17 |
Return slave NAK count |
|
18 |
Return slave busy count |
|
19 ... 21 |
Return bus Char overrun count |
|
Slave PLC address (MsgOut[3]) |
Enter the slave Modbus PLC address. Typically the Modbus address range is 1 ... 247. Function code 8 does NOT support Broadcast Mode (Address 0). |
|
Diagnostics function data field content (MsgOut[4]) |
You must enter the decimal value needed for the data area of the specific diagnostic subfunction: |
|
Subfonction Code |
Description |
|
02, 04, 10, 11, 12, 13, 16, 17 and 18 |
This value is automatically set to zero in the Modbus message sent to slave (this value is not reflected in the MsgOut buffer). |
|
00, 01, and 03 |
You must enter the desired data field value. For more details, refer to Modicon Modbus Protocol Reference Guide (www.modbus.org). |
|
Master PLC data area (MsgOut[5]) |
For all subfunctions, the master PLC data area is the destination for the data returned by the slave. You must specify a memory word %MW that marks the beginning of the data area where the returned data is placed. For example, to place the data into the master PLC data area starting at (%MW100), enter 100 in this field. Subfunction 04 does NOT return a response. For more details, refer to Modicon Modbus Protocol Reference Guide (www.modbus.org). |
|