|
Mounting Cards and Cables
|
|


|
(Original Document)
|
|
Mounting Cards and Cables
|
|
|
(Original Document)
|

|
Number
|
Designation
|
Comments
|
|---|---|---|
|
1
|
Equipped card
|
Receives electronic components
|
|
2
|
Body made of zamac
|
-
|
|
3
|
PCMCIA connector
|
Connector with 20 connection points
|
|
4
|
Upper cover
|
Houses the product reference label that shows the type of PCMCIA card
|
|
5
|
Removable cover
|
Ensures the card is displayed in its slot. The names of the two LEDs are printed on the front of the removable cover. This cover is also used to fix the PCMCIA card on the processor or on the TSX SCY 21601 module.
|
|
6
|
Linking cable with ferule
|
The ferule placed on the end of the PCMCIA card cable side prevents the cable being pinched by the removable cover. This ferule also eliminates the risk of causing a bending radius which can damage the quality of the link.
|
|
Step
|
Action
|
Illustration
|
|---|---|---|
|
1
|
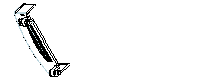
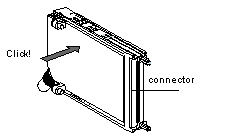
Connect the cable.
|
 |
|
2
|
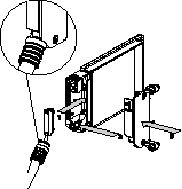
Place the appropriate cover on the device, taking care to insert the ferrule in the slot provided in order to fix the cable to the card.
|
|
|
3
|
Screw on the cover.
|
|
|
4
|
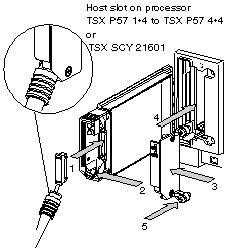
Insert the card in the slot provided in the host device.
|
|
|
5
|
Screw in the card to stop it being moved when switched on, and to ensure it functions effectively.
|
|
Step
|
Action
|
Illustration
|
|---|---|---|
|
1
|
Connect the cable.
|
 |
|
2
|
Place the appropriate cover on the device, taking care to insert the ferrule in the slot provided in order to fix the cable to the card.
|
|
|
3
|
Screw on the cover.
|
|
|
4
|
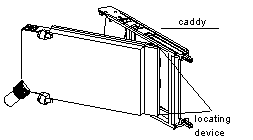
Remove the plastic cover from the caddy.
|
 |
|
5
|
Guide the card into the caddy from an oblique angle using the 2 locating devices.
|
 |
|
6
|
Slide the card into the caddy until it stops. The card is now firmly attached to the caddy.
|
 |
|
7
|
Insert the assembly (caddy and card) in the slot provided in the host device.
|
 |
|
8
|
Screw in the card to stop it being moved when switched on, and to ensure it functions effectively.
|
