The Control Expert EtherNet/IP configuration tool assigns a %MW memory address to the Inputs and outputs of a remote device, or a local slave, when it is activated.
By default:
-
a remote EtherNet/IP device is activated when it is added to an EtherNet/IP network, but
-
the EtherNet/IP communication module’s local slave function is not activated when it is automatically added to a newly created network; instead, it must be manually activated
This topic describes:
-
the effect of activating the local slave on the %MW memory address assignment for inputs and outputs of previously configured EtherNet/IP network
-
recommended practices to follow for consistent %MW memory address assignment to remote device inputs and outputs
Activating the Local Slave
When a new network is created, the Control Expert EtherNet/IP configuration tool adds a local slave node and—by default—assigns it the device Number of 000. Because the local slave function is not yet activated, the local slave’s inputs and outputs are not initially assigned a %MW memory address.
The following example describes the effect of activating the EtherNet/IP communication module’s local slave function after another remote device has already been configured and added to the network.
The sample EtherNet/IP network consists only of two nodes:
The sample EtherNet/IP network has been configured as follows:
-
Total EtherNet/IP network inputs and outputs are set in the Configuration page of the EtherNet/IP communication module in Control Expert:
-
100 input words are reserved, beginning at %MW01
-
100 output words are reserved, beginning at %MW101
-
Local Slave inputs and outputs:
-
Remote device inputs and outputs:
The Devices window of the Control Expert EtherNet/IP configuration tool displays the network, as follows:
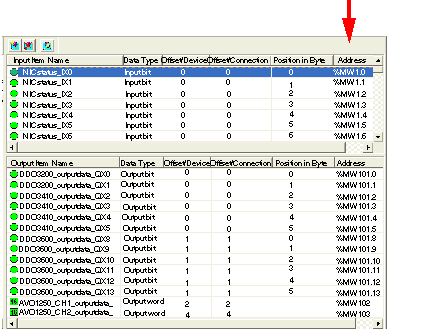
When you select the I/O Items node for the remote device, as indicated above, you display its previously configured input and output items—revealing their %MW memory address assignments:
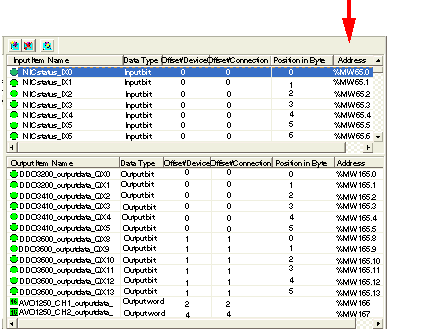
If you next activate the local slave function, by selecting Active Configuration in the General page of its Properties window, then re-open the I/O items node for the remote device, you will see that the %MW memory address assignments have changed—because they now are located behind the local slave’s inputs and outputs:
This shift of %MW input and output memory address assignments occurs because the assignment of a remote device’s, or a local slave’s, I/O to a specific %MW memory address depends upon the node’s relative position among active nodes in the EtherNet/IP network.
You can avoid this shift in input and output %MW memory addresses. When you activate the local slave function, be sure to change the local slave’s device Number from the default value of 000 to a value larger than the device number of the last device in the network.
In this example, setting the local slave’s device Number to 002 would preserve the remote device’s original %MW input and output memory address assignments.
To avoid the problem of shifting input and output %MW memory address assignments, consider the following recommended practices when developing your application:
-
As described above, when activating the local slave function of an EtherNet/IP communication module, change the local slave device Number from its default value of 000 to a value larger than the device number for the last device in your network.
-
When adding a new remote device to your EtherNet/IP network, always add it to the end of the device list and assign it a device Number larger than any other device number on your network.
-
When configuring function blocks in Control Expert, do not directly assign input and output pins to a specific %MW memory address. Instead, assign input and output pins to the derived data types and variables automatically created by Control Expert.