Modbus TCP Explicit Message Example: Read Register Request
Original instructions
Overview
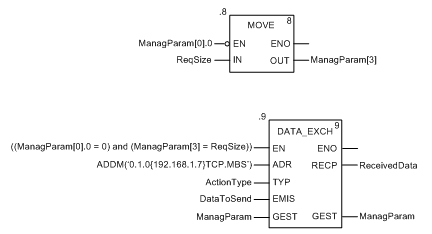
The following example shows you how to use the DATA_EXCH function block to send an explicit messaging Modbus TCP request to a remote device—in this case an STB NIP 2212 network interface module at IP address 192.168.1.7—to read a single word located in the remote device at register 5391.
Implementing the DATA_EXCH Function Block
To implement the DATA_EXCH function block, you need to create and assign variables for the following blocks:
Declaring Variables
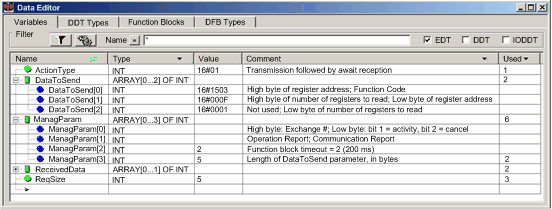
In this example, the following variables were defined. You can, of course, use different variable names in your explicit messaging configurations.
Configuring the Address Variable
The Address variable identifies the explicit message originating device (in this example, the communication module) and the target device. Note that the Address variable does not include the Unit ID element. Use the ADDM function to convert the following character string to an address:
ADDM(‘0.1.0{192.168.1.7}TCP.MBS’), where:
NOTE: As indicated above, the configuration of the ADDM function in this example does not include a Unit ID element, which – if included – would be inserted after the “}” following the remote device IP address and would be followed by a “.” (e.g., ADDM(‘0.1.0{192.168.1.7}0.TCP.MBS’), where 0 is the Unit ID). The configuration of the ADDM function, as set forth above, will work for most Modbus TCP devices. However, there may be some exceptions, as noted below:
  • Unit ID = 255: The absence of an express Unit ID value will be interpreted as Unit ID = 255. For some devices, a Unit ID of 255 is used to access Ethernet diagnostic data through Modbus TCP (via Modbus FC03 “Read Holding Registers”). Refer to the Quantum platform topic Supported Diagnostic Codes for diagnostics available to Modbus TCP devices.
  • Unit ID 100: For other Modbus TCP devices, Unit ID = 100 is used for the same purpose as Unit ID = 255, as described above. Refer to the Modicon M580 platform topic Diagnostics Available through Modbus/TCP for additional information.
Configuring the ActionType Variable
The ActionType variable identifies the function type for the DATA_EXCH function block:
Variable
Description
Value (hex)
ActionType
Transmission followed by wait for response
16#01
Configuring the DataToSend Variable
The DataToSend variable contains the target register address and the number of registers to read:
Variable
Description
Value (hex)
DataToSend[0]
  • High byte = Most significant byte (MSB) of register address 16#15 (21 decimal)
  • Low byte = function code: 16#03 (03 decimal)
16#1503
DataToSend[1]
  • High byte = Most significant byte (MSB) of the number of registers to read: 16#00 (0 decimal)
  • Low byte = Least significant byte (LSB) of register address: 16#0F (15 decimal)
16#000F
DataToSend[2]
CIP request instance information:
  • High byte = not used: 16#00 (0 decimal)
  • Low byte = Least significant byte (LSB) of the number of registers to read: 16#01 (1 decimal)
16#0001
Viewing the Response
Use a Control Expert Animation table to display the ReceivedData variable array. Note that the ReceivedData variable array consists of the entire data buffer.
To display the Modbus TCP response, follow these steps:
Step
Action
1
In Control Expert, select Tools → Project Browser to open the Project Browser.
2
In the Project Browser, select the Animation Tables folder, then click the right mouse button. A pop-up menu appears.
3
Select New Animation Table in the pop-up menu. A new animation table and its properties dialog both open.
4
In the Properties dialog, edit the following values:
Name
Type in a table name. For this example: ReceivedData.
Functional module
Accept the default <None>.
Comment
(Optional) Type your comment here.
Number of animated characters
Type in 100, representing the size of the data buffer in words.
5
The completed Properties dialog looks like this:
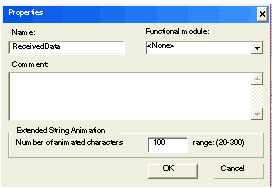
Click OK to close the dialog.
6
In the animation table’s Name column, type in the name of the variable assigned to the databuffer: ReceivedData and hit Enter. The animation table displays the ReceivedData variable.
7
Expand the ReceivedData variable to display its word array, where you can view the CIP response contained in the ReceivedData variable:
Note: Each array entry presents 2 bytes of data in little endian format. For example, ‘03’ in word[0] is the low byte, and ‘02’ is the high byte.