|
Creating a Project in Control Expert
|
|
|
Original instructions
|
|
Step
|
Action
|
|---|---|
|
1
|
Open Control Expert.
|
|
2
|
In the main menu, select File → New....
The New Project window opens displaying a list of Schneider-Electric controller types.
|
|
3
|
In the New Project window, expand the Modicon M340 node to select a CPU.
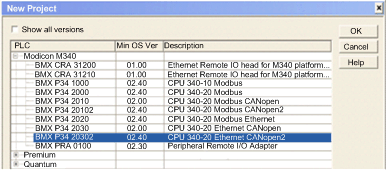 In this example, select the BMX P34 20302 Ethernet CANopen2 controller.
NOTE: By selecting the BMX P34 20302 Ethernet CANopen2 controller, you can later select the BMX NOC 0401.2 Ethernet communication module. |
|
4
|
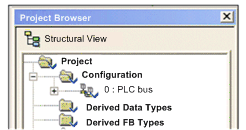
Click OK. The Project Browser, below, opens.
 |
|
5
|
To save the project, select File → Save. The Save As dialog opens.
|
|
6
|
In the Save As dialog, type in a File name—which will be the name of your project—then click Save. Control Expert saves your project to the specified path location.
NOTE: You can change the default location Control Expert uses to store project files. Before saving your project:
1
Select Tools → Options. The Options Management window opens.
2
In the left pane, navigate to Options → General → Paths.
3
In the right pane, type in a new path location for the Project path. You can also edit the:
|
|
Step
|
Action
|
|---|---|
|
7
|
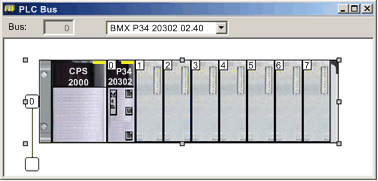
In the Project Browser, double click 0 : PLC bus to display both the:
|
|
8
|
In the Hardware catalog, under the Supply node, use your mouse to select then drag a BMX CPS 2000 power supply to the first position in the rack.
 |
|
9
|
In the File menu, select Save, to save your edits.
NOTE: Schneider-Electric recommends that you periodically save your changes as you make edits. |
|
Step
|
Action
|
|---|---|
|
10
|
Returning to the Hardware catalog, under the Communication node, use your mouse to select then drag a BMX NOC 0401.2 Ethernet communication module to an open slot in the rack—in this example, slot 2.
NOTE: You can select the BMX NOC 0401.2 only after:
When you drop the communication module into the rack, Control Expert opens the communication module Properties window.
|
|
11
|
In the General page of the module properties window, type in an alias name for the communication module: NOC01:
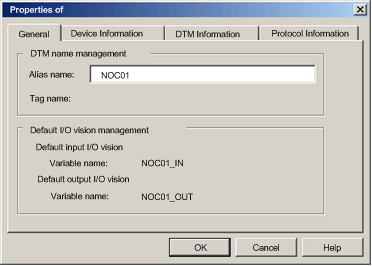 When you change the alias name, Control Expert changes the base input and output type and variable names to match the edited alias name.
NOTE: Schneider Electric recommends that you assign a unique alias name to each communication module.This practice helps you distinguish between modules of the same type. |
|
12
|
In the File menu, select Save, to save your edits.
|
|
13
|
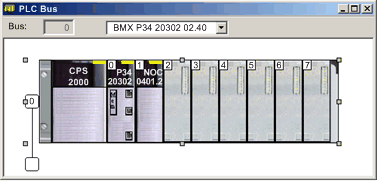
Click OK to close the Properties window. The Local Bus now displays the three modules you have added:
 |
|
14
|