|
Configuring I/O Items
|
|
|
Original instructions
|
|
Step
|
Action
|
|---|---|
|
1
|
In the Advantys configuration software, select Island → I/O Image Overview. The I/O Image window opens to the Fieldbus Image page.
|
|
2
|
Select the first cell (word 1, cell 0) in the Input Data table to display—in the middle of the page—a description of the cell data and its source module.
|
|
3
|
Make a note of the word, bit(s), module and item information for that cell.
|
|
4
|
Repeat steps 2 and 3 for each cell containing either an S or an integer.
|
|
Advantys Fieldbus Image
|
Control Expert EIP Items
|
STB Module
|
Description
|
||
|---|---|---|---|---|---|
|
Word
|
Bit(s)
|
Byte
|
Bit(s)
|
||
|
1
|
0-15
|
0
|
0-7
|
NIC 2212
|
low byte status
|
|
1
|
0-7
|
high byte status
|
|||
|
2
|
0-1
|
2
|
0-1
|
DDI 3230
|
input data
|
|
2-3
|
2-3
|
DDI 3230
|
input status
|
||
|
4-5
|
4-5
|
DDO 3200
|
output data echo
|
||
|
6-7
|
6-7
|
DDO 3200
|
output status
|
||
|
8-11
|
3
|
0-3
|
DDI 3420
|
input data
|
|
|
12-15
|
4-7
|
DDI 3420
|
input status
|
||
|
3
|
0-3
|
4
|
0-3
|
DDO 3410
|
output data echo
|
|
4-7
|
4-7
|
DDO 3410
|
output status
|
||
|
8-13
|
5
|
0-5
|
DDI 3610
|
input data
|
|
|
14-15
|
6-7
|
NA
|
not used
|
||
|
4
|
0-5
|
6
|
0-5
|
DDI 3610
|
input status
|
|
6-7
|
6-7
|
NA
|
not used
|
||
|
8-13
|
7
|
0-5
|
DDO 3600
|
output data echo
|
|
|
14-15
|
6-7
|
NA
|
not used
|
||
|
5
|
0-5
|
8
|
0-5
|
DDO 3600
|
output status
|
|
6-15
|
8
|
6-7
|
NA
|
not used
|
|
|
9
|
0-7
|
||||
|
6
|
0-15
|
10
|
0-7
|
AVI 1270
|
input data ch 1
|
|
11
|
0-7
|
||||
|
7
|
0-7
|
12
|
0-7
|
AVI 1270
|
input status ch 1
|
|
8-15
|
13
|
0-7
|
NA
|
not used
|
|
|
8
|
0-15
|
14
|
0-7
|
AVI 1270
|
input data ch 2
|
|
15
|
0-7
|
||||
|
9
|
0-7
|
16
|
0-7
|
AVI 1270
|
input status ch 2
|
|
8-15
|
17
|
0-7
|
AVO 1250
|
output status ch 1
|
|
|
10
|
0-7
|
18
|
0-7
|
AVO 1250
|
output status ch 2
|
|
8-15
|
NA
|
NA
|
NA
|
not used
|
|
|
Advantys Fieldbus Image
|
Control Expert EIP Items
|
Module
|
Description
|
||
|---|---|---|---|---|---|
|
Word
|
Bit(s)
|
Byte
|
Bit(s)
|
||
|
1
|
0-1
|
0
|
0-1
|
DDO 3200
|
output data
|
|
2-5
|
2-5
|
DDO 3410
|
output data
|
||
|
6-7
|
6-7
|
NA
|
not used
|
||
|
8-13
|
1
|
0-5
|
DDO 3600
|
output data
|
|
|
14-15
|
6-7
|
NA
|
not used
|
||
|
2
|
0-15
|
2
|
0-7
|
AVO 1250
|
output data ch 1
|
|
3
|
0-7
|
||||
|
3
|
0-15
|
4
|
0-7
|
AVO 1250
|
output data ch 2
|
|
5
|
0-7
|
||||
|
Step
|
Action
|
|---|---|
|
1
|
In the DTM Browser, select the communication module:
 |
|
2
|
Do one of the following:
The Device Editor opens, displaying the DTM for the communication module.
|
|
3
|
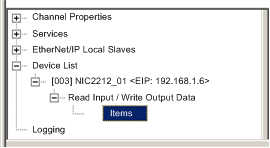
In the left pane of the Device Editor, navigate to and select the Items node for the STB NIC 2212 network interface module:
 |
|
4
|
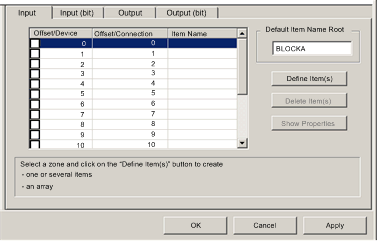
The Items window opens:
 |
|
5
|
Select the Input (bit) tab to display that page.
|
|
6
|
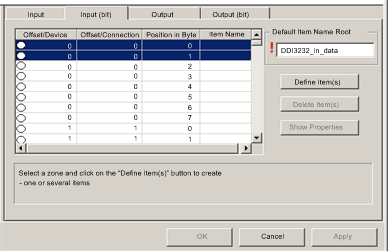
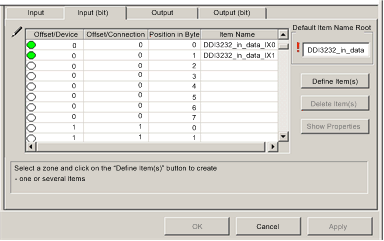
In the Input (bit) page, type the following default root name—representing device status—into the Default Items Name Root input box type: DDI3232_in_data.
|
|
7
|
In the Items List, select the first 2 rows in the table. (These rows represent bits 0-1 in byte.)
 |
|
8
|
Click the Define Item(s) button. The Item Name Definition dialog opens:
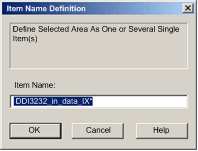 Note: The asterisk (*) indicates a series of discrete items with the same root name will be created.
|
|
9
|
Accept the default Item Name and click OK. 2 discrete input items are created:
 |
|
10
|
Click Apply to save the items, and leave the page open.
|
|
11
|
Repeat steps 6 - 10 for each group of discrete input items you need to create. In this example, that includes items for each of the following groups:
|
|
12
|
The next task is to create input bytes and words.
|
|
Step
|
Action
|
|---|---|
|
1
|
Select the Input tab to return to that page:
 NOTE: In this example, both the Offset/Device and Offset/Connection columns represent the byte address. The items you create will be either an 8-bit byte or a 16-bit word |
|
2
|
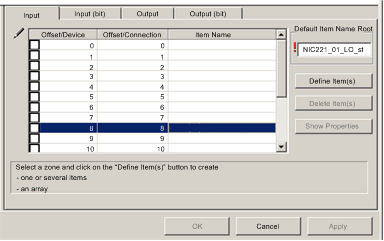
In the Default Item Name Root input box type: NIC22212_01_LO_st.
|
|
3
|
Starting at the first available whole input word, select the single row at byte 8:
 |
|
4
|
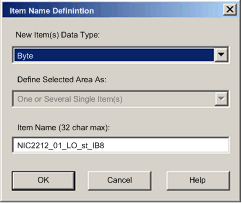
Click the Define Item(s) button. The Item Name Definition dialog opens:
 |
|
5
|
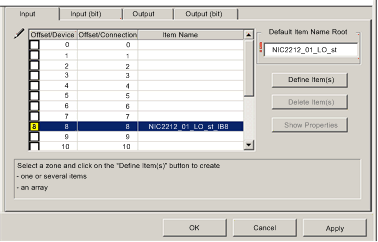
Select Byte as the New Item(s) Data Type, then click OK. A new byte item is created:
 |
|
6
|
Click Apply to save the new items, and leave the page open.
|
|
7
|
Repeat steps 2 - 6 for each byte or word input item you need to create.
NOTE: The number of rows you select for a new item depends upon the item type. If the item is a:
In this example, you will create items for each of the following:
|
|
8
|
The next task is to create output bits.
|
|
Step
|
Action
|
|---|---|
|
1
|
Select the Output (bit) tab to open the following page:
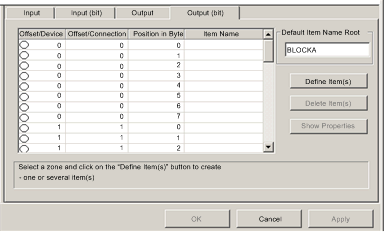 NOTE: Both the Offset/Device and Offset/Connection columns represent the byte address of an output, while the Position in Byte column indicates the bit position—within the byte—of each discrete output item. |
|
2
|
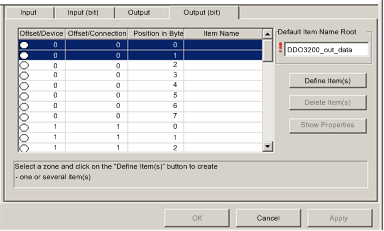
In the Default Items Name Root input box type: DDO3200_out_data.
|
|
3
|
In the Items List, select the rows that correspond to bits 0-1 in byte 0—i.e., the first 2 rows:
 |
|
4
|
Click the Define Item(s) button. The Item Name Definition dialog opens:
 NOTE: The asterisk (*) indicates a series of discrete items with the same root name will be created. |
|
5
|
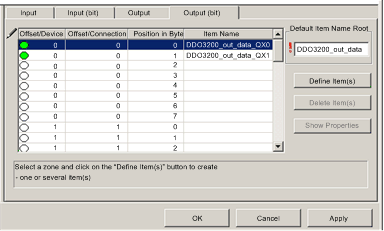
Accept the default output name and click OK. 2 discrete output items are created:
 |
|
6
|
Click Apply to save the new items, and leave the page open.
|
|
7
|
Repeat steps 2 - 6 for each group of discrete output items you need to create. In this example, that includes items for each of the following groups:
|
|
8
|
The next task is to create output bytes and words.
|
|
Step
|
Action
|
|---|---|
|
1
|
Click on the Output tab to open the following page:
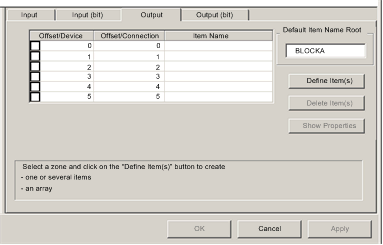 NOTE: In this example, both the Offset/Device and Offset/Connection columns represent the byte address. The items you create will be 16-bit words comprising 2 bytes. |
|
2
|
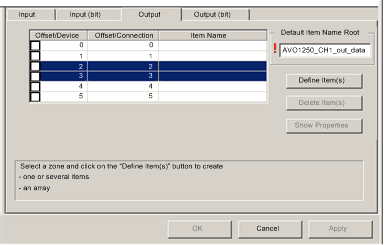
In the Default Item Name Root input box type: AVO1250_CH1_out_data.
|
|
3
|
Starting at the next available whole word, select 2 rows: 2 and 3:
 |
|
4
|
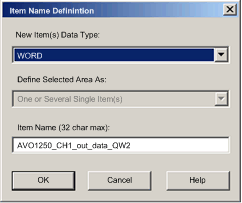
Click the Define Item(s) button. The Item Name Definition dialog opens:
 |
|
5
|
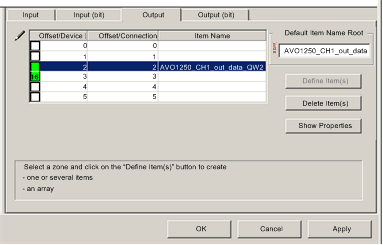
Accept the default output name and click OK. the following output word item is created:
 |
|
6
|
Click Apply to save the new item and leave the page open.
|
|
7
|
Repeat steps 2 - 6 for the AVO 1250 channel 2 output data at bytes 4 and 5.
|
|
8
|
Click OK to close the Items window.
|
|
9
|
Select File → Save to save your edits.
|