|
Installing the BMENOS0300 Module
|
|


|
Original instructions
|
|
Installing the BMENOS0300 Module
|
|
|
Original instructions
|
|
Backplane
|
Description
|
|---|---|
|
BMEXBP04001
|
4-slot Ethernet backplane
|
|
BMEXBP0400(H)1
|
4-slot hardened Ethernet backplane
|
|
BMEXBP08001
|
8-slot Ethernet backplane
|
|
BMEXBP0800(H)1
|
8-slot hardened Ethernet backplane
|
|
BMEXBP12001, 2
|
12-slot Ethernet backplane
|
|
BMEXBP1200(H)1, 2
|
12-slot hardened Ethernet backplane
|
|
BMEXBP0602 (H)
|
10-slot hardened Ethernet and X Bus backplane
|
|
BMEXBP1002 (H)3
|
6-slot hardened Ethernet and X Bus backplane
|
|
1. In a local rack, slots 0 and 1 are reserved for the CPU.
2. In the 12-slot Ethernet backplane, slots 2, 8, 10, and 11 are X Bus only slots.
3. In the 10-slot Ethernet backplane, slots 2 and 8 are X Bus only slots.
|
|
|
Step
|
Action
|
|---|---|
|
1
|
Turn off the power supply to the rack.
|
|
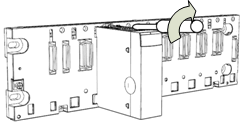
2
|
Remove the protective cover from the module interface on the rack.
|
|
3
|
a: Insert the locating pins on the bottom of the module into the corresponding slots in the rack.
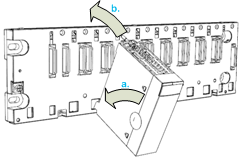 b: Use the locating pins as a hinge and pivot the module until it is flush with the rack. (The connector on the back of the module inserts into the Ethernet connector on the rack.)
|
|
4
|
Tighten the retaining screw to hold the module in place on the rack:
 Tightening torque: 0.4...1.5 N•m (0.30...1.10 lbf-ft)
|
  DANGER DANGER |
|
HAZARD OF ELECTRIC SHOCK
If you cannot prove that the end of a shielded cable is connected to the local ground, the cable must be considered as dangerous and personal protective equipment (PPE) must be worn.
Failure to follow these instructions will result in death or serious injury.
|
