|
EtherNet/IP Explicit Message Example: Get_Attribute_Single
|
|


|
Original instructions
|
|
EtherNet/IP Explicit Message Example: Get_Attribute_Single
|
|
|
Original instructions
|
|
Variable
|
Description
|
Value (hex)
|
|---|---|---|
|
ActionType
|
Transmission followed by wait for response
|
16#01
|
|
Variable
|
Description
|
Value (hex)
|
|---|---|---|
|
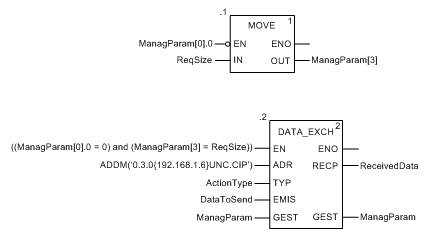
DataToSend[0]
|
CIP request service information:
|
16#030E
|
|
DataToSend[1]
|
CIP request class information:
|
16#0420
|
|
DataToSend[2]
|
CIP request instance information:
|
16#6424
|
|
DataToSend[3]
|
CIP request attribute information:
|
16#0330
|
|
Step
|
Action
|
|
|---|---|---|
|
1
|
In Control Expert, select Tools → Project Browser to open the Project Browser.
|
|
|
2
|
In the Project Browser, select the Animation Tables folder, then click the right mouse button. A pop-up menu appears.
|
|
|
3
|
Select New Animation Table in the pop-up menu. A new animation table and its properties dialog both open.
|
|
|
4
|
In the Properties dialog, edit the following values:
|
|
|
Name
|
Type in a table name. For this example: ReceivedData.
|
|
|
Functional module
|
Accept the default <None>.
|
|
|
Comment
|
(Optional) Type your comment here.
|
|
|
Number of animated characters
|
Type in 100, representing the size of the data buffer in words.
|
|
|
5
|
Click OK to close the dialog.
|
|
|
6
|
In the animation table’s Name column, type the name of the variable assigned to the RECP pin: ReceivedData and press Enter. The animation table displays the ReceivedData variable.
|
|
|
7
|
Expand the ReceivedData variable to display its word array, where you can view the CIP response contained in the ReceivedData variable.
NOTE: Each array entry presents 2 bytes of data in little endian format, where the least significant byte is stored in the smallest memory address. For example, ‘8E’ in word[0] is the lower byte, and ‘00’ is the upper byte. |
|
